

When Margaret was visiting me In Kuala Lumpur a couple of weeks ago she was talking about some new designs she was working on that use controlling the colour of space or dip dyed yarn as part of the pattern. It seems a good idea to revive her original post as the new projects build on the concept. And once I had tracked down the information it provoked my curiousity enough to try it out.
The legacy post from 2005 (Margaret)
When I was teaching in Canada and the U.S.A in April/May last year (2004) I had several requests for the “secret” of having colours in scarves knitted from hand dyed yarn so they were not random. Since I have been home they have multiplied so here it is!
(This doesn’t work with multiple wrap patterns)
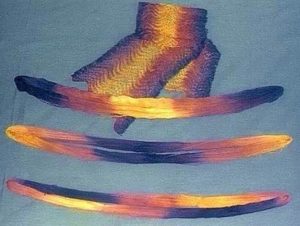
- Take your skien and line it up with the colours where you want them. The photo shows three options with the top one knitted.
- With a crochet thread/contrasting yarn make a chain with more stitches than you will need.
- Use your knitting needle to pick up the loops on the reverse of the chain.
- Before winding the ball mark the beginning and end of the first colour sequence you have chosen. Knit as many loops as fit in that sequence. (Ignore any extra crochet stitches). This is the number of stitches for your scarf.
- Adjust edge stitches/pattern repeats to fit your stitch number. You now have
your pattern set for your unique gauge. - Complete scarf leaving sufficient yarn after casting off so that you can unravel the chain placing scarf stitches on the needle and cast off with scarf yarn.
N.B. With hand dyed yarns every so often there will be places where the colour moves off track but that adds to the charm.
If you’d like to experiment in 2018 (Sonja)
How do I know if yarn is space or dip dyed ?
To fully understand this original post it is useful to know that Artisan Lace was one of the first hand dyed yarns on the market. Several of the colour ways were dip dyed to create the effect you can see in Margaret’s image (if you have Mandli in Knitsch Sock it used the same dye process as Pansy in Artisan Lace) Commercially a similar effect called space dyeing is used where yarn is dyed in short controlled sections.
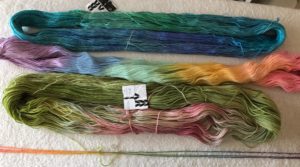
At this point of time its not particularly common to find New Zealand yarn indie-dyed in this way, and even if it has been it may not be obvious in the skien if a dyer has re-skeined (re-wound) it. The way to tell if a yarn has been dyed like this is to open it out as I have done in the following illustration. You can see the distinct blocks of colour along the skien.
I had to go for a fairly deep stash dive to find some examples – and its interesting that most of the examples I found and can think of are from established indie dyers from those earlier days. Wollmeise still use this technique extensively, as does Sweet Georgia, Lorna’s Laces, and Hand Maiden Yarns. They usually knit up as variegated and the yarns most likely to pool. Don’t be confused between this style and gradient or self striping yarns which use a much longer colour repeat.
So does it work?
While I knew it worked for Artisan Lace and had seen several samples, I was curious if it worked in other weights. Coincidentally I picked up a copy of this month’s (July 2018) The Knitter and there was an article by another knitter who had been playing with this idea.
 I have a skein of Wollmeise Daisy which is a classic example of this technique – you can seem the clean blocks of colour and symmetry even in the skien. It was wound up for socks I was knitting but out of curiosity I pulled out the centre and laid it out in its repeat. I thought I would try an inch or so of Trellis Lace, one of Margaret’s simple scarf patterns, as a demonstration. If you are going to choose a project to try this make it simple as the main focus is the colour.
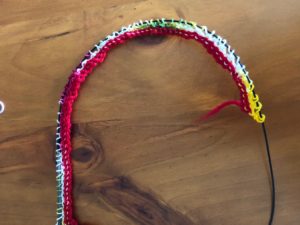
 Once I established the skein repeat I played with it a little bit to get the sequence I liked. This colour way is symmetrical and I went with yellow-white-green-white-pink-white-green-white- yellow.
 I did a provisional crochet cast on for about 70 stitches on a 4mm – if you are trying this go for a longer cast on than I did, maybe 80-85 in 4 ply. You don’t have to use all the stitches but is annoying if you run out. The provisional crochet cast on I used was this one from You Tube.
- You need to find the point where if you start knitting you will have a complete colour sequence and you also need to have allowed enough to come back and cast off your starting edge as per Margaret’s instructions. Once you have found that point start knitting about half way along the colour you want at the edge (mine was yellow)
- Knit across the colour sequence until you get to half way through the edge colour on the other side. By only using half the edge colour you are allowing for the reverse row.
- Turn and knit back – indie dyes are never totally perfect but you should find all the sequences lining up.
As I continued mine didn’t quite work and began to shift slightly out of line. This was because the pattern I chose had a 13 +2 repeat and when I added the extra 3 or 4 stitches I needed to meet that, it threw the alignment off. Margaret pointed out to me that I could possibly fix this by altering my needle size to change the gauge. Alternatively a shorter repeat lace would have worked.
If you are keen to try this it’s worth a fiddle. It is one of those clever techniques which impresses 🙂
Resources
Apart from the original post there were two other resources I consulted.
On of the more useful books I have read about understanding hand dyed yarn and how dying methods knit up, is an older Interweave book Knitting Socks in Handpainted Yarn by Carol Sulcoski. You should be able to get it from the library or it is also available as an ebook. The first few chapters are quite short but provide a good explanation of how the different dyeing techniques impact on colour flow in patterns.
For a techie version of how colour sequences change based on tension and stitch count this article on the YarnSub about working with multi coloured yarns has a fascinating interactive graphic, where her husband coded how the colour repeat would change based on stitch count and her gauge. Thanks to The Knitters Magazine Issue 126 for the article that sent me off to find this (and the techie side of me wants to see if I can create something similar as well)
One Reply to “Controlling colour movement”